Changing the State of Multiple Documents in ProjectWise

Changing the State of Multiple Documents in ProjectWise

ProjectWise Workflow States, though commonly misunderstood, can be a very useful tool in managing your organization’s document workflows. When a user changes the State of a document or multiple documents via the Change State command, a notification can be sent which lets group members know that the document has changed States. This notification flag makes communication much easier. This procedure does require that users have the Change State ability enabled in their user settings along with ProjectWise messaging agents configured. Additionally, the user must have the Change Workflow State permission on the document.

The first thing a user will need to do to change the State of multiple documents is to navigate to the target folder and highlight one of the documents that require a State change. From that point, the user would navigate to the main Document pull-down menu and select the option Change State. When Change State is selected, several sub-options will become available. The user will then select the Change option.

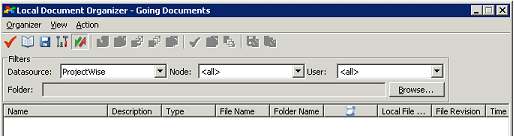
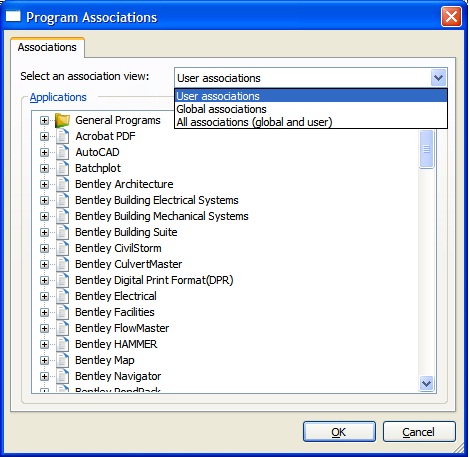
From there a dialog box like the one seen below will appear.
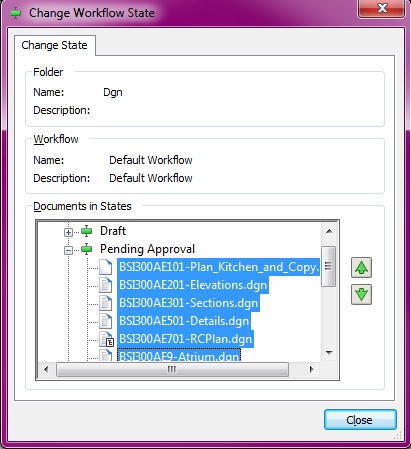
sept 1
Figure 1

Within this dialog box, the user can change the State of multiple documents at one time by doing one of two methods. The first method is to hold down the CTRL key while selecting the targeted documents. The second method is to select the first document in the list, hold down the Shift key, and select the last document in the list.

Once the documents are selected, as seen in the figure above, the user can use the green arrows (depending on which direction the targeted State is in) to move the documents to the next State. The user’s documents should now appear in the next State as seen in the figure below.
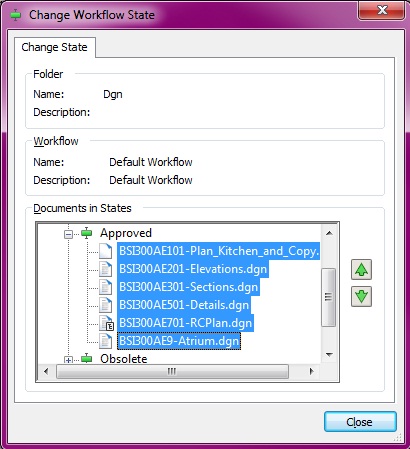
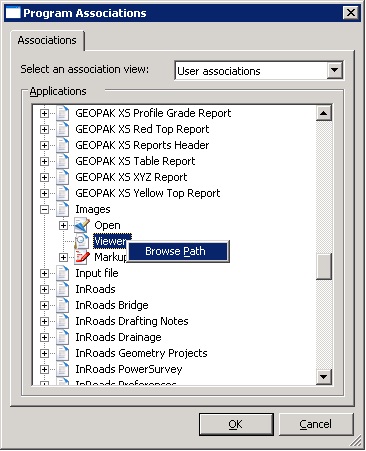
sept 2
Figure 2

If the target State is more than one State over in the list, be sure to select the documents as needed and move them an additional State using the green arrows. Another method to move multiple documents up or down is to highlight the documents that are needed and drag them from the original State and drop them in the desired State.

If one of the document’s State was changed accidentally, a user can revert that individual document to the original State by highlighting the document within the document pane, right clicking on the document, selecting the Change State option, and then selecting Previous.

Finding "Going" Documents in the Local Document Organizer

Finding "Going" Documents in the Local Document Organizer

From time to time, file transfers from the ProjectWise file storage area to the client are interrupted resulting in incomplete file transfers and the files being stuck in either a “Going Out” or “Coming In” status. This typically happens when a file transfer such as a Check Out or Check In is interrupted by a slow or unreliable network connection. While a document is in a Going Out or Coming In status, users will not be able to check them out.

The Local Document Organizer utility provides a convenient way to find these files and free them if necessary.

1. In the ProjectWise Explorer, open the Local Document Organizer by going to Tools > Local Document Organizer.

2. In the Datasource pull down menu, select the Datasource that you want to check for going documents.

3. In the Node pull down menu, select to show all workstations that have connected to the datasource.

4. In the Users pull down menu, select to show Going documents from all users in the datasource.

may 11
Figure 1

5. Change the view to Going Documents by selecting View > Going Documents. There also is a Going Document icon indicated by the two opposing arrows.

6. The list of Going Documents will now be displayed in the Local Document Organizer. These can be freed by going to Action > Free.

Viewing Office Documents in the ProjectWise Explorer Photo Preview Pane

Viewing Office Documents in the ProjectWise Explorer Photo Preview Pane

The Photo Preview tab in the ProjectWise Explorer allows you to display image files stored in ProjectWise without having to copy them out and use a viewing program to display them. Prior to the SELECTseries 1 release of ProjectWise, the preview of Office documents in the Photo Preview tab was limited, but it is now supported in a read-only mode.

By default, the display of Office documents in the Photo Preview tab is disabled. In order to enable the preview of Office documents, you will need to edit the file \Program Files\ProjectWise\bin \pwviewer.cfg in a text editor such as Notepad. Removing the # sign from the beginning of a line in the pwviewer.cfg file will enable the preview of all documents of that type. For a complete list of the application and document types supported in pwviewer.cfg, please refer to the ProjectWise Implementation Guide included with the version of ProjectWise you are using.

Since this is a client-side configuration file, you will need to update the pwviewer.cfg on all client computers where you wish to enable the preview of Office documents.

february 2011 ezine_image_1
Figure 1

Note that in order to use the Photo Preview tab with Office documents, you will need to have Microsoft Office 2007 and use Windows Vista or Windows 7 operating systems. Windows XP is supported if you have Windows Search 4.0 or newer installed.

Creating and Using Document Links in ProjectWise

Creating and Using Document Links in ProjectWise

One of the more underused features of ProjectWise is its ability to create links to documents stored within ProjectWise. These links can then be saved to your desktop or sent to other users to provide quick access to documents and locations within ProjectWise. Using links rather than exporting documents out of ProjectWise has the advantage of providing the recipient of the link real-time access to your project data as opposed to a copy of a file which may be out of date by the time the recipient opens it.

When creating links from the ProjectWise Address Bar by right-clicking on an address, you have two options: Copy URL and Copy URN. URL refers to Uniform Resource Locator which is very similar to the URL that is used to enter web page addresses in a web browser. URN refers to Uniform Resource Name which is another Internet Standard for identifying resource locations.

march 2011
Figure 1

The difference between the two lies in the actual contents of the link. A URL link is easily readable by humans as you can see the entire path to the document and the document name spelled out. You can see this by pasting your link into a test document using the Notepad application.

pw://PW_SERVER:ProjectWise/Documents/Project 1009/Civil/1009_Profile_1

Instead of using the path and document name, a URN contains the document’s GUID (Globally Unique ID) which is a unique code assigned to the document when it is created. An example of a URN is pasted below for your reference.

pw://PW_SERVER:ProjectWise/Documents/D{1f5a97a4-7983-4ae0-a47d-e0fa1640ed5d}

The advantage of a URN is that the GUID for a document will not change as long as that document exists in ProjectWise, even if the document is moved or renamed making the link far more robust than a URL link. A link saved as URL will no longer work after a file has been moved or renamed since the contents of its path or document name will have changed.

Document links can also be created in the ProjectWise Explorer by using the Send to Mail Recipient as Link command or creating a document/folder link by simply dragging and dropping from ProjectWise to your desktop. The format of the link (URL or URN) is determined by the Use URN links User Setting. By default, this setting is turned off, so you will need to turn this on if you want to use URN links in ProjectWise.

march 2011_02
Figure 2

Document Viewers and the ProjectWise Explorer

Document Viewers and the ProjectWise Explorer

Last month’s article discussed the methods for globally defining the default viewing application in the ProjectWise Administrator. This time, we will cover how individual users can override those settings by choosing a file viewing application from the Program Associations dialog box in the ProjectWise Explorer.

1. In the ProjectWise Explorer, open the Program Associations dialog by going to Tools > Associations > Programs. In the association view, select User associations. If you select either the Global associations or All associations, you will not be able to make any changes to your program associations. Those two views are used to review the global settings made by the Administrator.

ezine_october_2010_4
Figure 1

2. In the Applications list, scroll to the Application which you would like to modify. In this example, we will modify the properties of the Images application to set the viewing application for image files.

3. Expand the application by clicking the plus next to it so that the options Open, Viewer, and Markup actions display. From here, you can set what application to run for each of the separate actions. The Viewer category determines what application is launched when you use the Document > View command on a file of that type.

4. Right click on the Viewer category and select the Browse Path command to select the viewing application.

ezine_october_2010_1
Figure 2

5. A dialog will display listing all of the applications currently installed on your computer. If you don’t see your viewing application listed, click the Browse button and you can then navigate to and select the executable for the viewing application. It’s recommend that you use the Program class rather than selecting the executable as this will store the program’s registry information rather than the path to an executable as this will ensure that the program will launch even if you run ProjectWise from a different computer.

ezine_october_2010_2
Figure 3

6. The application you selected will then be listed as the viewer for the specified ProjectWise application class.

7. Click OK to save your changes and then close the Program Associations dialog box.

Note:

• You can also set the Generic file viewer for file types which do not have an associated viewing application via the Program Associations dialog. To do this, select the General Programs category and expand the Generic File Viewer section. You can then select the viewer by double clicking on the Generic File Viewer listing and then selecting the program using the same techniques used to select the viewer for an application.

ezine_october_2010_3
Figure 4

Publish modules to the "offcanvs" position.