ProjectWise V8i SELECTseries 3 Enhancements - Storage Area Disk Usage

ProjectWise V8i SELECTseries 3 Enhancements - Storage Area Disk Usage

In this month’s article, we will discuss a few of the SELECTseries 3 enhancements that are available in the ProjectWise Explorer: Storage Area disk usage information and the ability to run reference scans without MicroStation being installed.

Storage Area Disk Usage

When creating new folders, or viewing the properties of existing folders, you can now view information related to the storage area where the folder is located by clicking on the Browse (…) button. This button appears next to the Storage Area list that is seen in the Create Folder and Folder Properties dialogs. This will open the Storage Properties dialog which displays information about the amount of available space on the volume your storage area is located on. The amount of space currently used by the selected Storage Area will also be displayed.
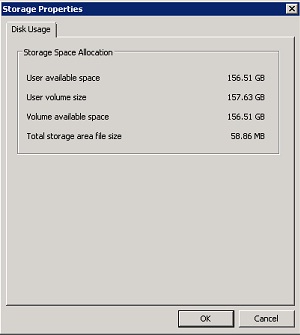
Figure 1

Reference Scan Requirements Change

In previous versions of ProjectWise, you were required to have MicroStation installed on workstations where you wanted to run the Reference Scan utility. As of the SELECTseries 3 release of ProjectWise, all of the components required to run a reference scan are now included with the ProjectWise Explorer and MicroStation is no longer needed to run a reference scan.

Keep in mind that you may be able to upgrade to the V8i SELECTseries 3 version of the ProjectWise Explorer to take advantage of these new features without having to upgrade your ProjectWise Integration Server. Please check the ProjectWise readme for the latest compatibility information before upgrading.

ProjectWise V8i SELECTseries 3 Enhancements - User and Group Management from the ProjectWise Explorer

ProjectWise V8i SELECTseries 3 Enhancements - User and Group Management from the ProjectWise Explorer

In previous articles, we discussed some of the security related enhancements in ProjectWise V8i SELECTseries3 including the Access Control Tab and the Restricted Administrators Group. In this month’s article, we’ll take a look at the Group Management feature which allows users to manage group memberships directly in the ProjectWise Explorer. This allows ProjectWise Administrators to delegate group membership management to non-administrative users without giving them access to all of the functionality of the ProjectWise Administrator application.

In order for a user to be able to administer group membership from the ProjectWise Explorer, they must be designated as a Group Owner. This can be done in the Group Properties dialog within the ProjectWise Administrator where you will notice the addition of an Owners tab. Users who are in the Owners list are allowed to manage the membership of that group from the ProjectWise Explorer.

Figure 1

The User/Group Management tool can then be launched from the ProjectWise Explorer by going to Tools > User Management. In this dialog box, you will notice three columns. The first column displays a listing of all of the Users and Groups in the current datasource. The second column displays the Users available to be added to the currently selected Group and the third column displays those users who are members of the currently selected group. Fields are available at the top of each column allowing you to narrow down the list of users by using filters on the user name, description, or their domain membership. This can make the list more manageable when dealing with large datasources. If the current user is not an Owner of the currently selected group, the message “Current user has no access to the list” will be displayed in the Available and Assigned columns.

Figure 2

Adding a user to a group is simply a matter of selecting the user in the available user column and double clicking the user name to move them into the assigned column. Double clicking the user name when it is in the assigned column has the effect of removing the user from the group. Arrow buttons are also located between the Available and Assigned columns that can be used to add/remove users from groups.

You will also notice that group owners are listed with a star next to their name. You can add or remove group owners by right-clicking on the user name and selecting either the Set Owner or Remove Owner command.

ProjectWise V8i SELECTseries 3 Enhancements - Granular Security

ProjectWise V8i SELECTseries 3 Enhancements - Granular Security

In our June article, we discussed the Access Control Tab in the ProjectWise Explorer which makes it easier to manage folder and document permissions. In this month’s article, we will talk about the Restricted Administrators Group that can be used to set granular security permissions in the ProjectWise Administrator.

In previous versions of ProjectWise, adding a user to the Administrators group gave those users full access to all of the functionality of the ProjectWise Administrator. This all or nothing approach gave you little flexibility when delegating the administrative responsibilities of ProjectWise to other users. The SELECTseries 3 release of ProjectWise introduces the concept of granular security which allows you to grant limited administrative rights to specific users via the Restricted Administrators group. This will allow you to delegate certain tasks such as user account management or environment editing to specific users without the risks associated with giving full access to power users who may not be completely familiar with all of the capabilities of the ProjectWise Administrator tools.

When creating a new datasource or upgrading an existing datasource to ProjectWise V8i SELECTseries 3, you will notice that a new default group named Restricted Administrators has been created. Adding users to this group allows you to then grant access to specific nodes in the ProjectWise Administrator such as Workspace Profiles or Environments to members of the Restricted Administrator Group. Note that just adding a user to the Restricted Administrators group does not give the user access to specific nodes. The user will be able to log in to the datasource via the ProjectWise Administrator, but will not see any of the nodes until you grant access to them by changing the node’s properties.

Right-clicking on a node and selecting the Properties command will open the Properties dialog for that node where you can then grant access to specific users using the Add button. Remember that users must also be a member of the Restricted Administrators group as well in order to be granted access. In the screen capture, you can see one user has been added to the Workspace Profiles node allowing that user to make changes to the Managed Workspace portion of ProjectWise.

august 2011
Figure 1

ProjectWise Messaging Agents - Change State Notifications

ProjectWise Messaging Agents -Change State Notifications

Last month we discussed the methods for changing the State of multiple documents within ProjectWise. It was mentioned that, if enabled, ProjectWise would send a message notifying users that a document has changed State. ProjectWise Messaging Agents are a very useful tool when there are multiple users involved in a Project that requires the tracking of multiple documents through a workflow. ProjectWise Messaging Agents also help to streamline the communication process between users and Project Managers that are in charge of approving documents.

In order to create ProjectWise Messaging Agents, users must be a ProjectWise Administrator and have access to the ProjectWise Administrator application.

1) Within the ProjectWise Administrator, navigate to the Messaging Service icon in the Console Tree and right-click in the blank area.

2) From the options that display, select New > Messaging Agent.

3) The Welcome to the New Messaging Agent Wizard will now display, click Next.

4) Within the Defining the Messaging Agent dialog box, you will see two key-in fields, Message Subject and Message Text. Key-in in State Change as the Message Subject and key-in This document has changed state within the Message Text field.

5) You will also see a pull-down menu to select the Message Type, select Email. This option will send an email via Outlook. The ProjectWise Message option utilizes the ProjectWise internal messaging system which can often be overlooked.

6) You will now be given the option to Attach Document. It is recommended to not attach a file so that the email is not too large in size.

ezine_10_11-image01
Figure 1

7) Within the Specifying Message Recipients dialog box, you can select who will receive the notification. You can select either individual users or groups. Be sure that all of the selected recipients have an associated email address in their User profile.

8) Within the Specifying Message Sending Mode, you will be able to select the option of sending the message silently or showing the dialog box before sending the message. It is recommended to select the option to show a dialog to send the message.

9) Within the Specifying Command Type and Sending Time dialog box, you will see a pull-down menu for the Command Type, select Document State Change. You will have the option to send the message when the document leaves the current state or when the document enters the new state.

10) Within the Attaching Workflow State to Workflow Agent dialog box, you will be able to select which workflow will utilize the Messaging Agent.

11) You can now click next and Finish to complete the Messaging Agent setup.

ezine_10_11-image02
Figure 2

The Messaging Agents will now be enabled and notifications will be sent when documents go through a State Change as specified by the agent. It is important to remember that every associated document, when going through a state change, will trigger a notification and if a user changes the State of multiple documents, notifications will be sent for each individual document that undergoes a state change.

What Version of ProjectWise Explorer to Use

What Version of ProjectWise Explorer to Use

An upgrade to your ProjectWise server has typically meant that you need to upgrade all of your client installations of the ProjectWise Explorer at the same time. This would require a great deal of extra planning and effort as the upgrade of both the client and server software would have to take place at the same time. With the release of the V8i SELECTseries versions of ProjectWise, the requirements for the simultaneous upgrade of both the client and server software have been relaxed somewhat to make the transition to a new version of ProjectWise easier.

As of the SELECTseries 3 release of ProjectWise, all of the ProjectWise Explorer V8i SELECTseries clients (1, 2 , and 3) will work with any of the V8i SELECTseries 1, 2, and 3 ProjectWise Integration Servers. If you are still running the original V8i release of the ProjectWise Integration server, only the corresponding version of the V8i ProjectWise Explorer is supported. However, the ProjectWise V8i client will work with all V8i servers through the SELECTseries 3 release.

Of course, it is a good idea to eventually upgrade your clients to the latest version of the ProjectWise Explorer supported by your ProjectWise Integration Server in order to take advantage of all of the latest features and fixes available in ProjectWise. Please check the readme file included with the ProjectWise Server install for the latest information on which version of the ProjectWise Explorer to use with the version of the ProjectWise Integration Server you are upgrading to.

The requirements for upgrading your ProjectWise caching servers has also been relaxed as Bentley now suggests that you can temporarily run the prior version of the caching server after upgrading your integration server. This can also lessen the impact of an upgrade for ProjectWise deployments with multiple caching servers in different locations. Again, we always recommend referring to the ProjectWise readme file delivered with the version of the ProjectWise Integration Server you are planning to upgrade to for the latest compatibility information.

Publish modules to the "offcanvs" position.